All About Brows and More featuring Anastasia Beverly Hills products
Hello, Beauties! As I promised in my post "Four Different Ways to Shape and Fill in Eyebrows", today I'll be talking broadly about tips and tricks of perfectly shaped and filled brows.
Eyebrows are frames of the face. I cannot stretch enough how correctly shaped eyebrows can accentuate your beauty and make your face features stand out. As I mentioned in my previous post (link is above), today I will be expanding the topic of initial shaping of the brows. Let's begin!
There are many ways to shape the brows by plucking, waxing, threading or bleaching. I've written before that it is the best if you can follow the natural shape of your brows as much as possible. However, everyone has different brows: some very thin, some very thick, some nicely shaped and some with undefined shape. If you happen to be the latter one, here is a helpful chart I found online, that shows what eyebrow shape you should aim for according to your face shape.
Once you've determined your eyebrow shape, it is time to define the start, arch and the end of the brow. This is equally important step, since you don't want to end up with too short brows or dislocated arch. There is a golden ratio technique that helps you to determine the ideal brow length and arch location.
.jpeg)
I want to start with 5 elements Brow Kit, that is in top left in the picture above. It includes five different brow stencils, precision tweezers, brow powder duo, mini duo brush and clear brow gel. The color of my kit is dark brown. Once you open the box, all the products are nicely placed in the beautiful leather case with a zipper, which makes it so convenient to use. The kit also comes with a small booklet that explains the use of every element. Also there is a description of a Golden Ratio, according to which stencils were customized. So if you got confused with all the explanation of the rule i wrote above, you can simply place one of the Brow Kit's stencils on the brow and pick the one that allows the most of your natural brow hair through the cut out, without leaving too much exposed skin. Then you can just fill in the cut out area and voila, the filled in area is considered your ideal arch and length of the brows.
Here is the demonstration of the stencil use on my brow. As you can see points I, II, III show start, end and arch of the brow respectively. These points perfectly matched with my previously shaped brows, whoohoo! Stencils are indeed follow the Golden Ratio technique.

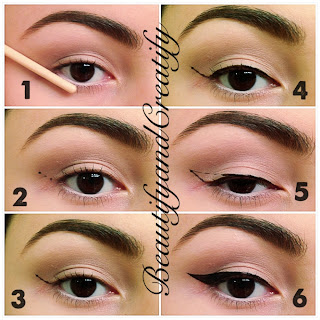
I was also sent Brow Wiz eyebrow pencil in brunette and Brow Duality Highlighting Duo Pencil in shell/lace. So, using the Brow Kit, Brow wiz and Duo Pencil I filled in my brows. Here is step by step pictorial.

1. My bare brow.
2. I plucked all the little grown hair around the brow using tweezers.
3. Using spooley side of the brush I slightly brushed my brow hair into place.
4. Using Brow Wiz pencil I outlined the shape of the brow by lining top and bottom.
5. Then I started filling in the brows using brush and brow powder duo. I used lighter color in the inner half of my brow and darker color in the outer half of the brow. Filling the brows in gradient will make them look more natural.
6. Using spooley side of the brush I blended out the color and harshness.
7. Using Shell side of the Brow Duality Duo pencil I highlighted the browbone and above the brow, this also cleans all the smudges from the spooley at the same time.
8. Last, but not least I applied Clear Brow Gel for the finishing touch to set and define brows all day.
I must say, I was highly impressed by the quality of these products. You can compare this to my previous brow filling routine (link is above) and notice the difference from the picture. In my honest opinion, these products are worth buying. You can easily use just Brow Wiz pencil for your brows, it is good enough to fill in and shape the brows (I use it for quick makeup on a daily basis, when i don't have enough time to go over all the steps above).
I was also sent a Brow Genius Kit, which includes Brow Wiz loose powder, Beauty Genius Clear Waterproof Gel and Applicator brush. This Kit is considered to make your brows waterproof by filling and shaping them. Here is how to use it:

1. Swipe the brow brush along one side of beauty genius applicator tip to collect the clear waterproofing gel.
2. Mix beauty genius and brow wiz loose powder together to form a paste.
3. Fix using the brush to fill in your brows.
Easy, right? But you have to be quick, because waterproof formula dries fast. This beauty genius gel can also be used to waterproof any loose powder eyeliner or even eyeshadow pigment. Just don't forget to clean your brush at the end.
This way of filling brows is perfect for hot and humid summer weather, or when you are going to the beach, swimming in the pool. It really stays put a long time!
Speaking of summer, do you want a natural and waterproof recipe for the eyes? Here it is. All you have to do is apply Lace side of Brow Duality Highlighting Duo Pencil on the lid. Then apply Covet Waterproof eyeliner in Midnight along the lashline and smudge it out. Apply Covet waterproof Eyeliner in Gilded on the waterline and finish off by applying your favorite waterproof mascara. The eyeliners were also kindly sent to me by Anastasia Beverly Hills.

My final thought on all of these products is - these are all very very great quality products. Products in the kits can be used all together or separately, or incorporated in different other looks and products. I am personally loving using all of these products on a daily basis. Thank you once again, Anastasia!! To learn more about these products, visit: www.anastasia.net
Hope this blog post was informative for you.
Eyebrows are frames of the face. I cannot stretch enough how correctly shaped eyebrows can accentuate your beauty and make your face features stand out. As I mentioned in my previous post (link is above), today I will be expanding the topic of initial shaping of the brows. Let's begin!
There are many ways to shape the brows by plucking, waxing, threading or bleaching. I've written before that it is the best if you can follow the natural shape of your brows as much as possible. However, everyone has different brows: some very thin, some very thick, some nicely shaped and some with undefined shape. If you happen to be the latter one, here is a helpful chart I found online, that shows what eyebrow shape you should aim for according to your face shape.
 |
| Image from Google |
Once you've determined your eyebrow shape, it is time to define the start, arch and the end of the brow. This is equally important step, since you don't want to end up with too short brows or dislocated arch. There is a golden ratio technique that helps you to determine the ideal brow length and arch location.
 |
| Image from Google |
According the Golden Ratio the start of your brows should be aligned with the center of your nostril. To find this point, you can hold straight object vertically from the center of your nostril upwards towards the brows.
To find the point where the brows end, place straight object diagonally from the bottom outside corner of the nostril to the outside corner of the eye and mark intersection point with the brow.
The arch of the brow is determined by aligning straight object from the tip of the nose diagonally through the middle of the pupil. Wherever the object meets the brow, this point should be the highest point of the brows.
What's next? Once you've defined the shape, marked the points of arch and length of the brow, you can start shaping the brows by plucking, threading and etc. Remember, do not over-tweeze the brows, take your time to reach the ideal shape for your face.
Edited to add: I now have a video tutorial that demonstrates the technique:
Edited to add: I now have a video tutorial that demonstrates the technique:
I was blessed and my work was recognized by the beautiful owner of Anastasia Beverly Hills (www.anastasia.net) - Anastasia. Moreover, she was so generous to send some of her amazing products for me to try. So since I am talking about brows today, I thought it would be the perfect opportunity to review these products in this post.
.jpeg)
I want to start with 5 elements Brow Kit, that is in top left in the picture above. It includes five different brow stencils, precision tweezers, brow powder duo, mini duo brush and clear brow gel. The color of my kit is dark brown. Once you open the box, all the products are nicely placed in the beautiful leather case with a zipper, which makes it so convenient to use. The kit also comes with a small booklet that explains the use of every element. Also there is a description of a Golden Ratio, according to which stencils were customized. So if you got confused with all the explanation of the rule i wrote above, you can simply place one of the Brow Kit's stencils on the brow and pick the one that allows the most of your natural brow hair through the cut out, without leaving too much exposed skin. Then you can just fill in the cut out area and voila, the filled in area is considered your ideal arch and length of the brows.
Here is the demonstration of the stencil use on my brow. As you can see points I, II, III show start, end and arch of the brow respectively. These points perfectly matched with my previously shaped brows, whoohoo! Stencils are indeed follow the Golden Ratio technique.

I was also sent Brow Wiz eyebrow pencil in brunette and Brow Duality Highlighting Duo Pencil in shell/lace. So, using the Brow Kit, Brow wiz and Duo Pencil I filled in my brows. Here is step by step pictorial.

1. My bare brow.
2. I plucked all the little grown hair around the brow using tweezers.
3. Using spooley side of the brush I slightly brushed my brow hair into place.
4. Using Brow Wiz pencil I outlined the shape of the brow by lining top and bottom.
5. Then I started filling in the brows using brush and brow powder duo. I used lighter color in the inner half of my brow and darker color in the outer half of the brow. Filling the brows in gradient will make them look more natural.
6. Using spooley side of the brush I blended out the color and harshness.
7. Using Shell side of the Brow Duality Duo pencil I highlighted the browbone and above the brow, this also cleans all the smudges from the spooley at the same time.
8. Last, but not least I applied Clear Brow Gel for the finishing touch to set and define brows all day.
I must say, I was highly impressed by the quality of these products. You can compare this to my previous brow filling routine (link is above) and notice the difference from the picture. In my honest opinion, these products are worth buying. You can easily use just Brow Wiz pencil for your brows, it is good enough to fill in and shape the brows (I use it for quick makeup on a daily basis, when i don't have enough time to go over all the steps above).
I was also sent a Brow Genius Kit, which includes Brow Wiz loose powder, Beauty Genius Clear Waterproof Gel and Applicator brush. This Kit is considered to make your brows waterproof by filling and shaping them. Here is how to use it:

1. Swipe the brow brush along one side of beauty genius applicator tip to collect the clear waterproofing gel.
2. Mix beauty genius and brow wiz loose powder together to form a paste.
3. Fix using the brush to fill in your brows.
Easy, right? But you have to be quick, because waterproof formula dries fast. This beauty genius gel can also be used to waterproof any loose powder eyeliner or even eyeshadow pigment. Just don't forget to clean your brush at the end.
This way of filling brows is perfect for hot and humid summer weather, or when you are going to the beach, swimming in the pool. It really stays put a long time!
Speaking of summer, do you want a natural and waterproof recipe for the eyes? Here it is. All you have to do is apply Lace side of Brow Duality Highlighting Duo Pencil on the lid. Then apply Covet Waterproof eyeliner in Midnight along the lashline and smudge it out. Apply Covet waterproof Eyeliner in Gilded on the waterline and finish off by applying your favorite waterproof mascara. The eyeliners were also kindly sent to me by Anastasia Beverly Hills.

My final thought on all of these products is - these are all very very great quality products. Products in the kits can be used all together or separately, or incorporated in different other looks and products. I am personally loving using all of these products on a daily basis. Thank you once again, Anastasia!! To learn more about these products, visit: www.anastasia.net
Hope this blog post was informative for you.


wow awesome great tips thanks for sharing
ReplyDeleteyou are welcome!!
DeleteFor the brow genius kit, did you get it in medium brown or brunette?
ReplyDeleteI got it in brunette
DeleteThis is perfect. Thanks for sharing!
ReplyDeleteThank you and you are welcome! :*
DeleteAm african, but I love ur blog sister, great work and really inspiring
ReplyDeleteThank you so much for all of your lovely comments! I really appreciate it!
DeleteHello greetings from Czech Republic :) You have a really nice blog :) Nice article :)
ReplyDeletethank you so much
DeleteDo you apply your brows after you have applied moisturizer or after all your makeup? I've heard both ways are okay but I have an oily face and am debating which way would work better. Thanks!
ReplyDeleteI usually apply the brow makeup after i applied my face makeup(foundation, etc), but before applying eye makeup. I feel like in this order the makeup would require the least touch up
Delete