How to Create Perfect Cat Eye - Winged Eyeliner 101
Is applying winged eyeliner shape is always a struggle for you? Don't worry, with practice you'll nail this technique in no time! Today I want to share with you some tips and tricks that can make the eyeliner application process so much easier for you. Let's get started!
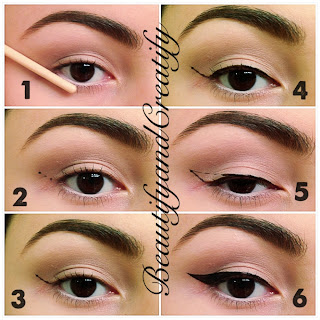
1. Line something straight (handle of the brush, credit card or ruler) along with the outer half of your lower lash line. Basically, place the straight object parallel to the waterline of the eye. This way you will get the angle of the wing on both eyes the same.
2. Now, holding a brush/ruler place a dot on the point where you want your wing to end. You can also add some more dots towards the outer corner of the eye to create a trace of the wing.
3. Connect the dots. Do the same on the other eye, so you can make sure you've got the same/similar wings on both eyes.
4. Line the upper lash line of the eye. Make the line thin, line it one small stroke at a time, as close to the lash line as possible.
5. Define a point where you want you wing to start. I like my wing to start from the center of my lid. Now draw small dashes connecting the end of the wing and the point where you want your wing to start.
6. Connect dashes and fill in the wing. If you want you can make the line along the upper lash line little thicker. Also the outer part of the wing can be cleaned/sharpened using wet wipe or a q-tip.
That's it! Now all you need is a little practice and drawing the cat eye will become the easiest thing for you!
Winged Liner for HOODED eyes. What if you have hooded eyes, like I do? Hooded eye shape is a type of an eye when the lid space is small or non-existent and the crease overlaps it. Working with this eye shape is always harder than with "regular" eye shapes. So here is an easy pictorial for you all!
1. Line your lashline.
2. Open your eyes and look straight. As I mentioned before, on hooded eye hooded lid overlaps middle lid when the eye open. Draw a wing on the overlapping hooded lid by looking straight ahead.
3. Now look down, connect the gap of the wing under the hooded lid and fill the wing in.
4. Smoothen the lines and you are done!
Winged Liner for ROUND eyes. For round eyes, try to make the wing shorter and the line along the lash line bolder. However, if you want more dramatic look, you can make the wing longer. In this case line the waterline with dark eyeliner as well, so the eye transformation/elongation wouldn't look too extreme. Also, if you want your eyes appear smaller, you can always line waterline and tightline upper lash line to make the big round eyes seem smaller.
None of the ways are working and you just can't get the winged liner right? Then use my favorite trick! Apply eyeliner (preferably soft kohl pencil) and smudge it! You can use some matte black eyeshadow to extend and soften the smudged liner. this way you can always achieve sultry, yet subtle winged liner look that is perfect for everyday or occasional makeup!
Hope you find this blog post helpful! Let me know if you have any requests!


wow nice iove it ............
ReplyDeletesanjogse
Hi!
ReplyDeleteI stumbled upon this via random Google-ing and let me just say that this is the BEST 'how to' for winged eyeliner I have found yet! Helped me do mine in WAY less than half the time it normally takes when I attempt it (which is saying a lot as it took me about half an hour the other day)!
So... yeah, awesome work and thanks for posting this! ^^
-Philippa. x
[http://ohmymeowy.blogspot.co.uk]
aww thank you so much! I'm so happy if it was useful! :)
DeleteThank you very much for the awesome tips. eyeliner tips
ReplyDeleteVery awesome tips! Permanent Make Up Eyeliner
ReplyDeleteThis eyes looks a lot like Marzia!!
ReplyDeleteCheck out these Bobbi Brown Long wear Gel Eyelinerwhich is an iconic liner that offers the accuracy of a fluid liner without hardly lifting a finger of a gel-based formula - all with 12 hours of waterproof and sweat- and humidity-resistant wear.
ReplyDelete