Posts

Showing posts with the label beauty

Introducing My First Ever YouTube Tutorial

Image
Hello, beauties! I am so excited to share with you another milestone in my beauty journey - creating YouTube channel and uploading my first video! I wanted to make this post to share the inspiration and the main idea behind the channel I created.

Plum and Gold (Fall colors inspired) make up look

Image
Hello, lovelies! During the past year I have created very many looks and shared them on my social media (Instagram, Facebook and Twitter). I decided to post some of my favorites on this blog as well, so that people can get more detailed information on how-to steps, as well as, look at the pictures with better resolution. Here I am sharing with you a look with plum and golden shades, that was initially inspired by Fall colors. I used Tarte Cosmetics Rainforest After Dark limited edition eye and cheek palette to create this look. Hope you like it!

Shimmery Turquoise and Gold Holiday Makeup Tutorial

Image
Hello, my beautiful readers! Today I am back with pretty holiday look pictorial incorporating gold and shimmery turquoise shades. I used all Motives Cosmetics to create the eye makeup look and Anastasia Beverly Hills Products on my brows. 

Never be Afraid of Color featuring BH cosmetics 120 color palette 2nd edition

Image
When I first started building my professional makeup kit, the most important criteria for my makeup purchases were quality and affordability. One of my very first purchases was BH cosmetics 120 color palette of 2nd edition. I got this palette, because it had variety of colors, as well as some neutral and earth tone shades. Moreover, it was very affordable. My first impression of the eyeshadow colors was their great pigmentation and easy application. However, looking at some colors, like vivid yellow or bright orange, I had no idea what they could be used for. I would always think that bright colors would make one look ridiculous. I was so wrong. I started practicing my editorial makeup looks using bright shades from the palette, so I would not use up the ones that I use on my subtle everyday looks. However, while exploring the world of colors I was amazed by how the harmony of few shades can bring the makeup to totally another level. I started looking for inspiration in the n...

Creative Cut Crease Look: Tarte Cosmetics Review

Image
Hello my beautiful readers! I am back today with another review and pretty look that you could wear to a special occasion. If you follow me on Instagram, you might already know that Tarte Cosmetics were so kind to send me their products for the review. Everything pictured above was selected according to my skin tone/type and preferences, and today I will be reviewing all of them. These are the very first Tarte products in my makeup collection and I was so excited to receive them! The first thing that caught my attention was packaging: it is so unique, cool and beautiful. I also loved that Tarte products are all natural, vegan friendly and cruelty free. All of their products formulated without parabens, mineral oil, gluten and many other chemicals that are hard to write and pronunciate. I went right into swatching and creating looks.  I created the following cut crease look with a twist and I added some rhinestones to make it look more glamorous.  Let's start...

Pin Up Makeup Look

Image
Hello, my beautiful readers! Today I want to share with you this classic makeup look that I created a while ago. Unfortunately I don't have a pictorial of the process of creation, but I'll describe the steps for you, so you can recreate it by yourself. This makeup look is called differently: pin up look, rockabilly, Merilyn Monroe's look and etc. However, for me this will always be a classic winged liner and perfect red lip combination.  Let's get started! 1. Make sure that your brows are filled in accurately and tweezed/groomed nicely.  2. Once the eyelids are primed, apply matte white shade all over the lid. 3.  Now using small pencil brush apply matte dark brown shade on the crease line.  4. Using lighter brown shade, blend the dark brown crease line upwards, towards the browbone area.  5. Highlight the brow bone area, apply white eyeliner on the waterline and draw a cat eye winged liner on the lash line using liquid liner.  6....

How to Create Perfect Cat Eye - Winged Eyeliner 101

Image
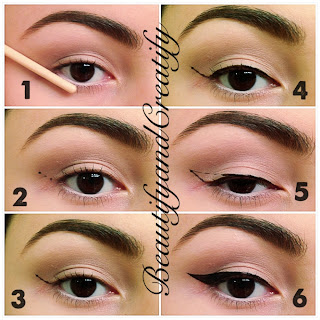
Is applying winged eyeliner shape is always a struggle for you? Don't worry, with practice you'll nail this technique in no time! Today I want to share with you some tips and tricks that can make the eyeliner application process so much easier for you. Let's get started!   1. Line something straight (handle of the brush, credit card or ruler) along with the outer half of your lower lash line. Basically, place the straight object parallel to the waterline of the eye. This way you will get the angle of the wing on both eyes the same.  2. Now, holding a brush/ruler place a dot on the point where you want your wing to end. You can also add some more dots towards the outer corner of the eye to create a trace of the wing.  3. Connect the dots. Do the same on the other eye, so you can make sure you've got the same/similar wings on both eyes. 4. Line the upper lash line of the eye. Make...

Elegant Makeup Look with Pop of Color

Image
 Hello, Beauties! I am sorry for being MIA last month here on the blogger. It was a very busy month for me. However, I always kept up posting different looks on other social media, such as facebook and Instagram. So, if you are not already, make sure follow me and get different makeup ideas, beauty tips and more! I decided to share some of my favorite looks I've done before with you all. Some of them, like this one today, was taken with my Iphone camera. I think the quality is good enough to post it here.   The look that I want to share with you today is created using earth toned colors and a touch of green. It is perfect for special occasion or night out. Let's get started!   1. Prime the lids. As I always write, this step is very important to keep your makeup in place. 2. Draw an extended wing as a V shape in the outer corner of the upper lid using black eyeliner pencil. 3. Smudge the liner with the use of little black shadow if needed. Use a smudgi...

Doll Transformation Makeup

Image
Hello, my beautiful blog readers!!!  Today I'd like to present to you something extraordinary and experimental, that I've tried to do last week - Doll Makeup Transformation. I just wanted to share with you how makeup can change one's appearance and make them look so fictional. I decided to show you how you can recreate this look, so that if you might decide to transform yourself into a doll this Halloween, you'll have a reference :). I apologize for poorer quality pictorial photo, since it was taken using my phone. So, let's get started! 1. After priming the eye lids, using eyeliner pencil extend the eye shape by drawing a line along the upper lash line, bringing it outwards and then connecting with the lower lid, as shown above. 2. Fill in the space with drawn extended eye with white eyeliner or white eyeshadow. 3. Now, imagining the drawn extension as an eye shape, draw a cut crease line on crease all the way above extended lash line. 4. Ap...

All About Brows and More featuring Anastasia Beverly Hills products

Image
Hello, Beauties! As I promised in my post "Four Different Ways to Shape and Fill in Eyebrows" , today I'll be talking broadly about tips and tricks of perfectly shaped and filled brows. Eyebrows are frames of the face. I cannot stretch enough how correctly shaped eyebrows can accentuate your beauty and make your face features stand out. As I mentioned in my previous post (link is above), today I will be expanding the topic of initial shaping of the brows. Let's begin! There are many ways to shape the brows by plucking, waxing, threading or bleaching. I've written before that it is the best if you can follow the natural shape of your brows as much as possible. However, everyone has different brows: some very thin, some very thick, some nicely shaped and some with undefined shape. If you happen to be the latter one, here is a helpful chart I found online, that shows what eyebrow shape you should aim for according to your face shape. Image from Google Once ...

Soft Purple and Pink Smokey Look

Image
Hello my beautiful readers! Today I'd like to show you how to recreate the following subtle and soft purple and pink smokey look. This is one of my favorite makeup looks, since it is colorful, yet so subtle. You can combine this look with soft pink lipstick or lip gloss. Let's get started!      1. Start by priming your lids. I never get tired of emphasizing how important this step is, especially when you want to create smokey effect. Priming helps blend the colors better, as well as increasing longevity of shadows. 2. Apply shimmery white shade in the inner corner of the eye, bringing towards 1/3 of both upper and lower lids. 3. Apply rosy pink on the remaining 2/3 of the lid. For both steps 2 and 3 you can use eyeshadow brushes. 4. Using small angled brush apply black eyeshadow on the outer 2/3 of lower lid and bring the color upwards along the crease, over the pink shade. 5. Apply purple shadow over the black trace and using blending brush ...

Cartoon Lips!

Image
Hello Beauties! Today I'd like to present to you very fun tutorial that is very easy to recreate!   This lip art can be also called animated lip art or pop art lip. But I think cartoon lips describe this lip art very well too! It is amazing how animated the lips look, huh? Let's get started!      1. Start off by applying concealer/foundation all over the lips. 2. Apply the lipliner on the lips and fill the entire lips with it. 3. Outline the shape of the lips using black eyeliner. 4. Using the same liner draw a line in between, where the lips meet. Both on upper and lower lip. 5. Using liquid eyeliner draw little strokes that would resemble little folds/wrinkles of the lips. 6. Last, but not least, using face paint (or if you have a white liquid liner, you can use that too) draw some lines that would artificially make the lips glow.   That's it! Hope you liked today's creative lip art. "Others have seen what is and asked ...

Colorful Subtle Winged Eye Makeup Tutorial

Image
Hello beauties! Today I would like to present another makeup tutorial, which will show you how to create soft winged colorful makeup look. You can recreate this look with any color you want and it is wearable everywhere, everyday! It is perfect for summer, fun, yet very subtle look. Let's get started! 1. Begin by priming your lids. 2. Apply white matte shadow all over the lid up to an eyebrow. Then using matte light beige color define your crease, this will accentuate natural depth of the lid by avoiding the eye/lid look pale. 3. Using angled brush and turquoise(or any other color) eyeshadow draw the outline of the thick wing above your lashline.  4. Using smaller brush start blending the line outwards, by adding some color if necessary.  5. Apply white shimmer color within the outlined wing line.  6. Spray MAC fix+ spray on your brush (you can also use eye drops instead of fix+) and using the same turquoise shadow define the line once again. ...

Neutral Thin Cut Crease Cat-Eye Makeup Look

Image
Today's post will be about how to create neutral thin cut crease cat eye look. This look can be worn anywhere, whether it is special occasion or just a daily life event. This look is also a perfect elegant bridal look for any bride on her special day. Let's get started! 1. Start off by priming your eyes using eye shadow primer.  2. Using a black eyeliner pencil draw line by defining your crease and creating cat-eye shaped edge on the outer corner of the lid.  3. Apply light beige colored eyeshadow on your lid, within the limits of the drawn cut crease line.  4. Draw several strokes using pencil eyeliner by darkening outer corner of your lid.  5. Using matte black eyeshadow start gently blending the eyeliner towards the center of the lid until you reach smooth and gradient effect.  6. Using a black eyeliner pencil draw a line on the lower lid, right below the lashline/lashes. 7. Using matte black shadow blend the eyeliner by extending it ...

Everyday Purple Eye Makeup Tutorial

Image
I love purple! Especially, I love wearing purple eyeshadows on my eyes. Purple has so many different shades that could look great on any eye color. In today's blog post I want to show you an easy tutorial of how to create pretty purple eye makeup for everyday life. Let's begin! For this look you'll need 3 different shades of purple. But if you don't have 3 shades of purple, you can always replace lightest shade with soft pink color. Or, you can create darkest shade of purple by mixing the purple shadow with darker gray or black shades. So, here are the steps: 1. Apply eyeshadow primer all over the lid. You know how I always emphasize the importance of this step... 2. Using eyeshadow brush, pack lightest purple shade all over the lid. 3. Using bit darker purple and pencil brush, define your crease and blend out the color nicely with blending brush. 4. Take the darkest purple and apply it on the outer "V" of the eye by bringing it down to the e...

Artistic Heart Makeup Look

Image
Makeup is an art. Just like painter draws on canvas, makeup artist creates image on the face. Today's look that I want to present is not going to be something that you could wear everyday. It is more of an artistic makeup that I like to create sometimes. I recently joined instagram, it is a community/social network that allows people share various pictures. I came across many makeup artists' work that inspired me and I also started sharing some of my makeup looks there (my username is: beautifyandcreatify, for those who have instagram and would like to check out my photos). As well as sharing photos, there are different contests on instagram that you could join by uploading certain types of images. So this particular look was my submission for one of the contests which asked to create something that has a shape of heart using something that you love. Well, as you already have guessed, I love makeup and creating heart shaped image using makeup sounded just right to me. So this...

Neutral Spring Look with Pop of Color

Image
Hello my beautiful readers! In today's blog post I want to show you how to create one of my favorite looks - neutral makeup with pop of color. This look is perfect for spring. It is subtle, elegant and beautiful. This look can be worn on a daily basis. You can customize the look using different color as a pop color. It can be purple, green or any color that matches your outfit. I would suggest pairing this look with peachy or pink colored lipstick. But you can go with nude lip colors or just a lipgloss as well. Let's get started! 1. As usual, priming the eyelids are essential. Apply eye shadow base all over the lids, both upper and lower lids.  2. Apply beige/champagne color on your lid using eyeshadow brush. It can be either shimmery color or matte. I chose shimmery color, since it instantly brightens up the look. 3. Apply matte bronze color on your crease and using blending brush, blend it out well.  4. Take a pop color of your choice and apply it o...