Posts

Showing posts with the label creatify

Purple Creativity

Image
Today I want to share few looks from my "creatify" part. Hope you enjoy.

Doll Transformation Makeup

Image
Hello, my beautiful blog readers!!!  Today I'd like to present to you something extraordinary and experimental, that I've tried to do last week - Doll Makeup Transformation. I just wanted to share with you how makeup can change one's appearance and make them look so fictional. I decided to show you how you can recreate this look, so that if you might decide to transform yourself into a doll this Halloween, you'll have a reference :). I apologize for poorer quality pictorial photo, since it was taken using my phone. So, let's get started! 1. After priming the eye lids, using eyeliner pencil extend the eye shape by drawing a line along the upper lash line, bringing it outwards and then connecting with the lower lid, as shown above. 2. Fill in the space with drawn extended eye with white eyeliner or white eyeshadow. 3. Now, imagining the drawn extension as an eye shape, draw a cut crease line on crease all the way above extended lash line. 4. Ap...

Beef Stroganoff Recipe

Image
Hello my blogger family! I'd like to share with you one of my favorite recipes - Beef Stroganoff! I'm sure there are many ways to prepare this meal, but this is the way I like to cook it and it turns out delicious every single time! Let's get it started!      You'll need: 1 large onion (2 if small) 0.5 to 1 lb beef 4-5 mushrooms 3/4 cup of sour cream Cooking oil (I used olive oil) Salt and spices (I use ground garlic, basil, parsley and paprika)      Start off by cutting and chopping everything :). Slice the onions, cut the beef and mushrooms as shown in the picture.   Now pour a little bit of cooking oil into the pan and stir-fry beef and mushrooms. They do not need to be done, just little sautéed. You can add some spices and little bit of salt while stir frying. Once beef and mushrooms sautéed, take them out of the pan and place in the plate.   Add onions right away to the same pan where you sautéed ...

"The Secret" Wall Art - DIY Project

Image
Since I haven't written posts with DIY projects lately, I thought this week I would write one. Moreover, several weeks ago I finished my wall decor project! So, as you guessed, this post will be about creating yet another beautiful wall art piece for your house. Let's get started! I started off with 4 canvases and just 3 types of acrylic paint: black, white and grey. I wanted this wall art to be classic... in black and white... Thus, i painted all four canvases into black.  For this wall decor I picked picture of tulips as a background: two tulips connected with each others' leaves. Then I added some glowing effect and couple more paint touches. By the way, I was mixing the grey paint with a drop of black to make it darker, or with a drop of white to make it lighter, depending on what I needed. So here are steps 1-2-3 of the process.  Initially, I picked such background as the top of the painting would be empty, so I can write down inspirational quote...

Artistic Heart Makeup Look

Image
Makeup is an art. Just like painter draws on canvas, makeup artist creates image on the face. Today's look that I want to present is not going to be something that you could wear everyday. It is more of an artistic makeup that I like to create sometimes. I recently joined instagram, it is a community/social network that allows people share various pictures. I came across many makeup artists' work that inspired me and I also started sharing some of my makeup looks there (my username is: beautifyandcreatify, for those who have instagram and would like to check out my photos). As well as sharing photos, there are different contests on instagram that you could join by uploading certain types of images. So this particular look was my submission for one of the contests which asked to create something that has a shape of heart using something that you love. Well, as you already have guessed, I love makeup and creating heart shaped image using makeup sounded just right to me. So this...

"Stormy Night Sky", "Spring" and ombre

Image
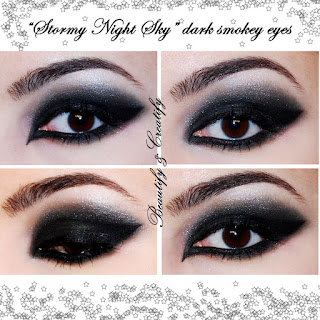
Smokey eyes... Beautiful and sophisticated application of different shades, transitioned smoothly one into another... I love creating smokey eyes. But you don't need too many colors to create pretty smokey eye look. One of my all-time favorites is dramatic smokey eye look using mainly one dark eyeshadow color. Here I am presenting you the make up look I created using black eyeshadow (plus, some gray-ish highlight color). I don't have a step to step pictorial for this look, because it is not difficult to recreate. All you need is to pack eyeshadow  on your upper and lower lid and BLEND! Blend, blend and blend more until you reach soft, gradient blended shade on your lid. Apply highlight on your browbone area and slightly blend in with the dark color. Apply the eyeliner and mascara, and you're done!  I named this look "Stormy Night Sky", since it is dark, yet mysterious and chic. I did a cat-eye look and then added a twist, by adding winged eyeliner in the inn...

DIY Project: Wall Art Decor

Image
Today I would like to share with you another DIY project that I did recently. I had the left over supplies from the nursery letters project and decided to turn them to some wall art decor using dot painting technique. Let's get started! For this project you need canvases (I had 4 canvases left from the previous project, but you could also use one larger canvas if you wish), acrylic paint and a couple of make up sponges (i got a whole pack of sponges for $1 in Dollar store). Now, let's make our "dot painting tool". Take a pen with a cap, cut a little piece out of your makeup sponge and tuck the sponge piece in the cap of the pen as shown below. That's it! Now you can easily paint with this easy-to-make and cheap dot painting tool. Let's move on to the painting. Put your canvases in desired arrangement and sketch the pattern that you picked. And start dot painting! Just dip your tool lightly in paint and make the dots along the pattern. Once you g...