Posts

Showing posts from February, 2013

"Stormy Night Sky", "Spring" and ombre

Image
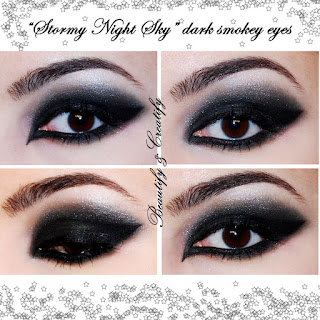
Smokey eyes... Beautiful and sophisticated application of different shades, transitioned smoothly one into another... I love creating smokey eyes. But you don't need too many colors to create pretty smokey eye look. One of my all-time favorites is dramatic smokey eye look using mainly one dark eyeshadow color. Here I am presenting you the make up look I created using black eyeshadow (plus, some gray-ish highlight color). I don't have a step to step pictorial for this look, because it is not difficult to recreate. All you need is to pack eyeshadow  on your upper and lower lid and BLEND! Blend, blend and blend more until you reach soft, gradient blended shade on your lid. Apply highlight on your browbone area and slightly blend in with the dark color. Apply the eyeliner and mascara, and you're done!  I named this look "Stormy Night Sky", since it is dark, yet mysterious and chic. I did a cat-eye look and then added a twist, by adding winged eyeliner in the inn...

Turquoise and Gold Makeup Look

Image
Today I'd like to show you another makeup look that is created using combination of beautiful colors: turquoise and gold. For your outfit with a turquoise detail or a golden touch, this look would be a perfect complement. Let's get started!  1. As usual, one of the most important steps is priming your eyes. Priming will help shadows last longer and blend smoothly. It also pops the colors up! 2. Apply turquoise shadow all over your lids (both upper and bottom), except the center of your upper lid. Easy way would be to apply in the outer corner and the inner corner of your eye, and then connect color by applying line through the crease. Use eyeshadow brush. 3. Using blending brush or a crease brush, slightly blend out the rough edges.  4. Using eyeshadow brush pack golden color in the center of your upper lid by slightly overlapping shadows to create a transition. Just pat the center of your bottom lid with whatever left on your brush. 5. Now, touch up turqu...

Elegant Neutral Make Up Look Tutorial

Image
Today I'd like to show you one of my favorite makeup looks that can be worn both everyday and on special occasions. Perhaps, this look could be a perfect bridal look as well! It's very elegant and looks great on any eye-color!  Let's begin! 1. Start by priming your eyelids. This step is crucial, since eye-primer not only helps to last eye makeup longer, but also it helps to enhance the color of the shadows and blend the shades smoothly with each other.  2. Using dark matte brown colored eye shadow draw a line along your crease with either angled eyeshadow brush or flat eyeliner brush. 3. Using a pencil brush, blend the line slightly. 4. Now, take an eyeshadow that is two or three shades lighter than dark brown in step 2, and apply it by blending in the outer part of your crease, above the line. Use blending brush or a crease brush.  5. Take light beige colored eyeshadow, and apply it below your brows and slightly bring down by blending it with t...

How To Make Your Lips Look Visibly Fuller

Image
For updated Fuller and Bigger Lips with video tutorial click here Today I want to show you a simple trick which you can use to make your lips look full and beautiful instantly. It is very easy and you can shape your lips this way by using just a lip liner and a lipstick, (plus lip gloss, but it is optional). Let's begin! Start off by applying lip liner around  the natural border of your lips. Create smooth and even "outer border" for your lips. However, make sure that you don't go too far with outlining the lips, since it may cause your lips' shape look very fake and inaccurate. Try to stay as close to natural border as possible. Now fill the lips with the lipliner. This will help the lipstick to last longer. Next, apply your lipstick. The last step is optional, which is applying lipgloss. I personally like to apply a lipgloss, since it kind of smooths all the layers of products together and creates one solid shape. I also applied a highlighter to my ...

DIY Project: Wall Art Decor

Image
Today I would like to share with you another DIY project that I did recently. I had the left over supplies from the nursery letters project and decided to turn them to some wall art decor using dot painting technique. Let's get started! For this project you need canvases (I had 4 canvases left from the previous project, but you could also use one larger canvas if you wish), acrylic paint and a couple of make up sponges (i got a whole pack of sponges for $1 in Dollar store). Now, let's make our "dot painting tool". Take a pen with a cap, cut a little piece out of your makeup sponge and tuck the sponge piece in the cap of the pen as shown below. That's it! Now you can easily paint with this easy-to-make and cheap dot painting tool. Let's move on to the painting. Put your canvases in desired arrangement and sketch the pattern that you picked. And start dot painting! Just dip your tool lightly in paint and make the dots along the pattern. Once you g...

Create your own nude lipstick

Image
There is a rule of a face makeup: when you have dark or vivid eye makeup, you should have more neutral lips and the other way around: vivid lip color should be combined with more of a natural makeup look. Lately, it's been a fashion trend to have very colorful and dark eye makeup and nude lips. If you don't have time or money to buy a nude lipstick, or you just couldn't find the nude color that matches you, this blog post is going to be helpful. I'm going to show you how you can create your own nude lipstick. It's very easy! All of us, ladies, have one lipstick, that is our favorite color and looks good on our lips when applied. Or maybe not even our favorite, still can be a good use for this! Just apply your regular lipstick (preferably rosy-colored, but again, it depends on your skin color, just choose what looks best on you). Now, take a little bit of your concealer or small amount of your foundation and apply over your lipstick using lip brush or a finger (I...

Healthy Homemade Hamburgers and Baked Fries

Image
Sometimes I really want to go to some fast food restaurant and order hamburger with fries and enjoy it... BUT, once I start thinking about how much fat is in fast food, how bad for your body it can be (I was more convinced after watching some documentaries about fast food) and since I'm a healthy eater, fast food just drops out of my lunch/dinner menu. However, hamburger and fries don't! You still can enjoy HEALTHY burgers and fries, which are way more delicious than in any fast food restaurant. My hubby loves them!! So, in this blog post I'll show you how I make my homemade hamburgers and fries from the scratch. Let's begin! I bake buns for hamburgers by myself, I usually make them from regular bread dough recipe (you can find the recipe here ). Before sending them into the oven I cover buns with plain yogurt and sesame seeds for some pretty finished product. Once buns are ready, time to move on to prepare burger meat.  For 5 servings you'll need: ...